Table of Contents
Spatial Position and Orientation tracking with a Virtual Reality Headset
Introduction
Real time or recorded 3D movements tracking can be complex to achieve from scratch. Specialized solutions for Motion Capture (MoCap) exist but may be found unadapted to the time frame, budget, or skill set of the project's team. An alternative to this is making use of the capabilities of Virtual Reality (VR) headsets in order to build a less specialized and optimal system that still fits their goals.
This section will detail how to setup a system that can use positional data from a VR headset and feed it over OSC to any other system.
Choosing a Headset
The first step is choosing a headset that fits what the project needs as not all headsets are made equal. This critical choice will be motivated by various criteria:
- availability, as not all headsets are available at all times in all countries;
- price, headsets can cost from a few hundred to a few thousand dollars;
- weight, this can be important if the headset is to be worn for extensive periods of time;
- tetheredness, applications may require more or less freedom of movement for the user;
- features, this is very much determined by what fits the project best, sometimes hand tracking is primordial as the hands of the user may need to stay free, other times the ability to display what the cameras capture to the user may be more important, or one might want to easily add more tracked points to the setup;
Many solutions exist but none is fit for every project, it has to be picked carefully and what seems to be the best headset may vary with time and design choices. In this tutorial, the chosen headset was the Oculus Quest 2. The choice of that headset was made for a project letting users walk in different rooms in Augmented Reality environments. The choice was then made based on the Quest 2 featuring limited AR and hand tracking, along with its untetherdness, and more practical considerations like its low price, immediate availability to the team, and past experience with similar models.
If the accuracy of the capture is of high importance, it will also be worth the time to look into technical evaluations of various headsets which can be found in the literature. For instance, a lot of work has been done around the scientific reliability of various headsets in different contexts 1) 2) 3) 4) 5) 6) 7), a compilation of the headsets, contexts and results may be useful here.
Setting up the Headset
As mentioned in the previous section, this tutorial will focus on the Quest 2, which requires to go through some steps to enable custom built apps on it, the engine Unity will be the focus of this section. The documentation provided by Oculus details all steps needed to achieve this. A phone with the oculus app and a Facebook account are needed to enable developing on a Quest 2 when this is written.
Building the App
Once OVRPlugin is imported, the OVRRig object can be added to the scene. This object represents the virtual space in which the user evolves and it provides various anchors for the head or controllers, thus allowing to access their position and orientation.
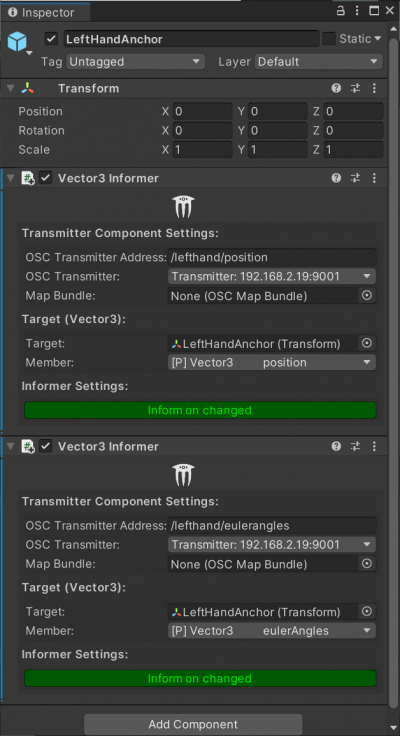
The goal of this tutorial is to send that data out of the headset over Wifi with OSC. To achieve this, the plugin extOSC for Unity is adapted. The OSCManager object needs to be added to the scene, in it the IP address and port of the server that will receive the OSC data can be set. Then, Informer scripts can be added that will send an OSC message with the value of any field of any object whenever it changes. For instance, one can add Vector3 Informer scripts to the LeftHandAnchor object, which can be found under OVRRig. There, the OSC address can be set, along with the transmitter in the OSCManager created previously, and the component containing the property to track, in this case the Transform of the anchor (it is possible to drag and drop the component into the field). Any of the Vector3 fields from that component can then be selected, for instance position and eulerAngles.
This process can be repeated for the head anchor, or the right hand anchor. After the app has been built and uploaded to the headset, the data is sent continuously to the specified address.

